Get Started
Installation
- Add to the VRChat Creator Companion using this link: Add to the VCC
- Make sure the "orels-Layout-Toolkit" Repository is added and selected in the Settings screen
- Open your World project and add the "ORL Layout Toolkit" Package
Single-file Installation
A single-file version of the package is available for download here.
- You can drop
ORLLayoutToolkit.csfile into any Editor folder in your project and it should work as expected - The only limitation of this approach is that you will not get the utility classes stylesheet included, so things like
Label().Class("pr-2")will need to be written likeLabel().Padding(0, 4, 0, 0) - If you're looking to actively edit the source code - it is recommended to use single-file installations, that will allow you to extend all the included partial classes easily
Basic Setup
- Inherit your EditorWindows from
ORL.Layout.EnhancedEditorWindowand your custom editors fromORL.Layout.EnhancedEditor - Override
CreateGUIandCreateInspectorGUIrespectively - Make sure to call the base method like
base.CreateGUI()andbase.CreateInspectorGUI() - See examples below
Simple Editor Window
using ORL.Layout;
using ORL.Layout.Extensions;
using UnityEditor;
using UnityEngine;
using UnityEngine.UIElements;

namespace Examples
{
    public class SimpleEditorWindow : EnhancedEditorWindow
    {
        [MenuItem("Tools/Simple Editor Window")]
        public static void ShowWindow()
        {
            var window = GetWindow<SimpleEditorWindow>();
            window.titleContent = new GUIContent("Simple Editor Window");
            window.Show();
        }

        private readonly ReactiveProperty<int> _counter = new(0);

        protected override VisualElement Render()
        {
            return VStack(
                Label("Sophisticated Couter").Bold().Margin(0, 0, 4),
                HStack(
                    Label().BoundPropText(_counter, c => $"Counter: {c}"),
                    Button(() => _counter.Set(_counter + 1)).Text("Increment")
                ).AlignItems(Align.Center).JustifyContent(Justify.SpaceBetween)
            ).Padding(4);
        }
    }
}
Let's go over the code a little bit
- We defined a
Render()method that returns aVisualElementtree - We started with a VStack (vertical stack) which is usually a good starting point for any layout as it simply aligns any children vertically
- We added a
Labelelement which was then bound to aReactiveProperty- A
ReactivePropertyis a simple container for any value, which can then be observed viaOnChangeand updated withSetmethods - In case of a
Labelif we had astringproperty - we could've simply bound it to theLabelwithBoundPropText(_myStringProp)method, as it is directly compatible withstringtype - Since we're using
ReactiveProperty<int>in this case - you need to supply a compute method, in this casec => $"Counter: {c}"which will be called every time the value changes
- A
- We then created a button that calls
Setmethod on theReactivePropertyto increment the counter, which automatically updates theLabeltext - The rest of the calls like
Bold(),Margin(),Padding()are all utility layout methods to make the inspector looks nicer
The final result looks something like this
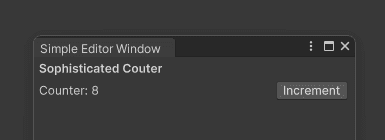
Simple Custom Inspector
Let's make a simple MonoBehaviour to hold some example data first
using UnityEngine;

namespace Examples
{
    public class Enemy : MonoBehaviour
    {
        public float health = 100;
        public float damage = 10;
        public Transform spawnPoint;
        public Transform target;
    }
}
This should be a good starting point.
By default, such a behaviour will have an inspector like this
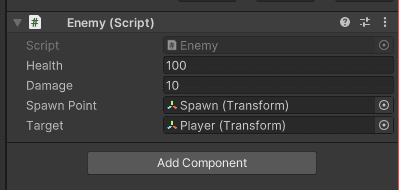
Which can be good enough for a lot of things, but what if you wanted some quick buttons to reset the health, or to respawn the enemy?
Let's write an inspector for it to enhance the base unity editing functionality
using ORL.Layout;
using ORL.Layout.Extensions;
using UnityEditor;
using UnityEngine.UIElements;

namespace Examples
{
    [CustomEditor(typeof(Enemy))]
    public class EnemyEditor : EnhancedEditor
    {
        protected override VisualElement Render()
        {
            return VStack(
                HStack(
                    PropertyField(serializedObject.FindProperty("health")).Flex(1),
                    Button(() =>
                    {
                        serializedObject.FindProperty("health").floatValue = 100;
                        serializedObject.ApplyModifiedProperties();
                    }).Text("Reset")
                ).JustifyContent(Justify.SpaceBetween),
                PropertyField(serializedObject.FindProperty("damage")),
                Label("Positions").Bold().Margin(10, 0, 0, 3),
                PropertyField(serializedObject.FindProperty("spawnPoint")),
                PropertyField(serializedObject.FindProperty("target")),
                Foldout().Text("Utilities").Class("unity-foldout").ViewDataKey("utilities-foldout").Margin(0, -4, 0, -14)
                    .Children(
                        HStack(
                            Button(() =>
                            {
                                var enemy = (Enemy)target;
                                enemy.health = 100;
                                enemy.transform.position = enemy.spawnPoint.position;
                            }).Text("Respawn"),
                            Button(() =>
                            {
                                var enemy = (Enemy)target;
                                enemy.health = 0;
                            }).Text("Kill")
                        )
                    )
            );
        }
    }
}
Let's walk through the new things in this example
- Since this is a custom inspector - it is common to rely on
serializedObjectto access the properties of the target object, so we usePropetyFieldfor a lot of regular fields as there is no reason to reinvent the wheel - To adjust the
healthproperty field via a "Reset" button we simply referenced it through the serialized object and updated all the properties in-place.- You can also use
ReactiveProperty<float>in a case like this, and then bind it to aserializedPropertyso it would automatically get updated when you callSet. Here's how that would look
- You can also use
private readonly ReactiveProperty<float> _health = new(100);

protected override VisualElement Render()
{
    var healhProp = serializedObject.FindProperty("health");
    _health.BindToProperty(healhProp).Set(healhProp.floatValue);
    return VStack(
        PropertyField(healhProp),
        Button(() => _health.Set(100)).Text("Reset")
    );
}
- There is no functional difference between the two approaches, so feel free to use whichever feels the most intuitive to you
BindToPropertydoes its best to map the type you used in theReactivePropertyto the type of theserializedPropertyand will show a warning message if they are incompatible
- We also leveraged
Foldoutto create a collapsible section for the utility buttons- The
ViewDataKeyis used to persist the state of the foldout between the inspector reloads
- The
- Lastly, we interacted directly with the current target object without persisting the changes to the serialized object, which is a common pattern when you want to perform some quick actions during play mode
The final inspector ends up looking like this
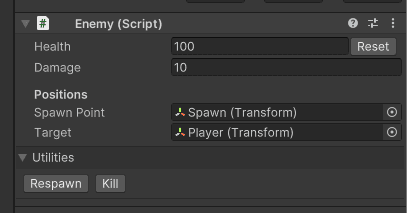
That's it for a general overview! If you want to learn about all the methods and elements available - keep reading!
If you ever encounter any issues - hop by the Discord and ask for help!
Elements
HStack
Aligns child elements horizontally
Usage
HStack(
    Label("Health:").Bold(),
    Label("100")
)

- You can use
.AlignItems()and.JustifyContent()to control the alignment and spacing of the children
VStack
Aligns child elements vertically
Usage
VStack(
    Label("Created By").Bold().Padding(0, 0, 4, 0),
    Label("You")
).AlignItems(Align.Center)
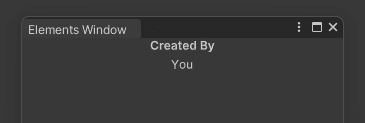
- You can use
.AlignItems()and.JustifyContent()to control the alignment and spacing of the children
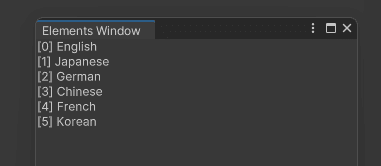
ForEach
Iterates overa a collection of elements and renders them using the provided template function
Usage
var items = new List<string> { "English", "Japanese", "German", "Chinese", "French", "Korean" };
return VStack(
    ForEach(items, (item, index) => HStack(
        Label($"[{index}] {item}")
    ))
);
- You generally want to use these inside of a stack layout to avoid any unexpected behavior
- To make them reactive - you want to use a
ReactivePropertyto store the collecting and then bindForEachto it viaBoundToPropmethod. Here's how that would look
private ReactiveProperty<List<string>> _items = new (new List<string> {
    "English",
    "Japanese",
    "German",
    "Chinese",
    "French",
    "Korean"
});

protected override VisualElement Render()
{
    return VStack(
        ForEach(_items.Value, (item, index) => HStack(
            Label($"[{index}] {item}"),
            Button(() =>
            {
                var list = new List<string>(_items.Value);
                list.RemoveAt(index);
                _items.Set(list);
            }).Text("Remove")
        ).JustifyContent(Justify.SpaceBetween)).BoundToProp(_items),
        HStack(
            Button(() =>
            {
                var list = new List<string>(_items.Value)
                {
                    $"New Item {_items.Value.Count}"
                };
                _items.Set(list);
            }).Text("Add")
        )
    );
}
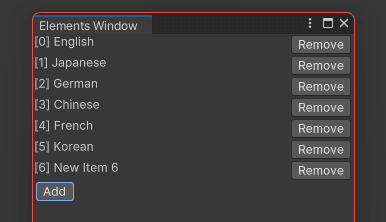
- This will make the
ForEachre-render automatically every time the items list is changed
Utility Methods
There are a lot of utility methods for all kinds of elements, I will not list them all here for now, you should check out the source code for those in the Extensions folder.
However, here are some extra callouts for escape hatches that you might want to use
Style
Label("Red background text").Style(el => el.backgroundColor = Color.red)
- This allows you to set any style property directly with a simple
Action<IStyle>lambda
Class
Foldout("Unity-like foldout").Class("unity-foldout")
- If you have some
ussclass you want to apply to an element - you can use theClassmethod to do so
ViewDataKey
Foldout("My Foldout").ViewDataKey("my-foldout")
- This is used to persist the state of the element between the inspector reloads. You should take a look at Unity's View Data Persistence documentation to learn which elements support this feature
ShowIf
private ReactiveProperty<bool> _extraOptionsVisible = new();

protected override VisualElement Render()
{
    return VStack(
        Toggle().Text("Show Extra Options").BoundPropValue(_extraOptionsVisible),
        Label("Extra Options").ShowIf(() => _extraOptionsVisible.Value),
    );
}
- This is a simple way to conditionally show an element based on some
Func<bool>. This has to run an update loop in the background, so the UI update can be delayed for up to 300ms
HideIf
private ReactiveProperty<bool> _extraOptionsVisible = new();

protected override VisualElement Render()
{
    return VStack(
        Toggle().Text("Simple Mode").BoundPropValue(_extraOptionsVisible),
        Label("Extra Options").HideIf(() => _extraOptionsVisible.Value),
    );
}
- This is a simple way to conditionally hide an element based on some
Func<bool>. This has to run an update loop in the background, so the UI update can be delayed for up to 300ms
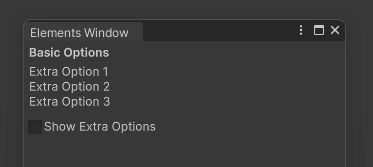
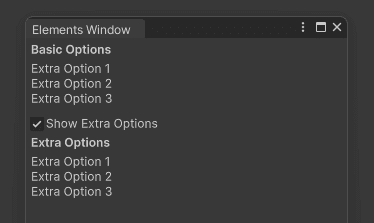
BindVisibleState
private ReactiveProperty<bool> _extraOptionsVisible = new();

protected override VisualElement Render()
{
    return VStack(
        Label("Basic Options").Bold().Margin(0, 0, 4, 0),
        VStack(
            Label("Extra Option 1"),
            Label("Extra Option 2"),
            Label("Extra Option 3")
        ),
        Toggle().Text("Show Extra Options").BoundPropValue(_extraOptionsVisible).Margin(10, 0, 0, 0),
        Label("Extra Options").Bold().Margin(4, 0, 4, 0).BindVisibleState(_extraOptionsVisible),
        VStack(
            Label("Extra Option 1"),
            Label("Extra Option 2"),
            Label("Extra Option 3")
        ).BindVisibleState(_extraOptionsVisible)
    ).Padding(4);
}
- If you're using
ReactiveProperty<bool>as the data source for visibility, you can use aBindVisibleStatemethod to bind the visibility of the element to the value of the property directly. This avoids an update loop and is a more efficient way of doing that overall
BoundPropText
private ReactiveProperty<string> _libraryName = new("My Library");

protected override VisualElement Render()
{
    return VStack(
        Label().BoundPropText(_libraryName),
        Button(() => _libraryName.Set("New Library")).Text("Change Library")
    );
}
- This allows you to bind a
ReactivePropertyto aLabelelement directly, as long as theReactivePropertyis of typestring
private ReactiveProperty<int> _counter = new(0);

protected override VisualElement Render()
{
    return VStack(
        Label().BoundPropText(_counter, c => $"Counter: {c}"),
        Button(() => _counter.Set(_counter + 1)).Text("Increment")
    );
}
- This allows you to bind a
ReactivePropertyto aLabelelement using any property type. TheFunc<T, string>will be called every time the value changes and the result will be set as the text of the label
BoundPropValue
private ReactiveProperty<string> _newElementName = new("New Element");

protected override VisualElement Render()
{
    return VStack(
        TextField().BoundPropValue(_newElementName),
        Label().BoundPropText(_newElementName)
    );
}
- This allows you to bind a
ReactivePropertyto aTextFieldelement directly, as long as theReactivePropertyis of typestring, and the value will be updated every time the user changes the text in the input field - BoundPropValue works on most field types provided by unity (as long as they implement
INotifyValueChanged<T>)
Escape hatches
Alognside the earlier mentioned Style, Class utilities, there are some other escape hatches that are worth noting.
Direct Instantiation
If some UI element is not covered by the toolkit, you can always instantiate it directly like this
VStack(
    Label("My Custom Element Below"),
    (new CustomElement(someParam)).Padding(4, 0)
)
If the element implements appropriate interfaces - things like Bind, BindPropValue and OnChange should work out of the box
Running arbitrary code
In cases where you need to call code on the visual element directly - you can use the OnMount and OnUnmount methods which accept an Action<VisualElement> lambda
VStack(
    Button(() => {}).Text("Click").OnMount(el => el.RegisterCallback<MouseUpEvent>(e => Debug.Log("Mouse Up")))
)
Please note that some elements already have exclusive event handlers bound, e.g.
MouseDownEventon aButton, so you won't be able to override them, as they are already used for the button's functionality
Saving References
If you need to save a reference to a visual element for later use - you can use the Ref method to save it to a variable
Button myButton = null;

return VStack(
    Button(() => { }).Text("Click").Ref(ref myButton),
    Button(() => { myButton.text = "Clicked another button"; }).Text("Modify button above")
);
This can be used to then later manipulate an element in something like OnChanged or a Button(() => {}) click handler
API Reference
Below is an auto-generated API reference for all the documented methods available in the toolkit
Button.OnClick
Binds a click event to the button
Button().Text("Click me").OnClick(() => Debug.Log("Clicked!"));
Parameters
- onClick - Click
Action
Button.OpenPopup
Opens a popup window when the button is clicked
Button().Text("Open Popup").OpenPopup(new TestPopup());
Notes
- You can use
EnhancedPopupWindowto create popups with OTK as well
Foldout.Text
Sets the text of the foldout
Foldout().Text("Foldout text");
INotifyValueChanged<SType>.BoundPropValue
Binds a property to the value of the field
private ReactiveProperty<string> _text = new("Hello");
protected override VisualElement Render()
{
    return VStack(
        TextField("Type some text!").BoundPropValue(_text),
        Label().BoundPropText(_text)
    );
}
Parameters
- prop -
ReactiveProperty<T>to bind to, must match the field type
INotifyValueChanged<SType>.OnChange
Binds a generic callback to the value change event
TextField("Type some text").OnChange(e => Debug.Log(e.newValue));
Parameters
- onChange -
ChangeEventcallback to bind
TextElement.Text
Sets the text of a TextElement
Button().Text("Click me!");
TextElement.BoundPropText
Binds a ReactiveProperty to the text of a TextElement.
This will automatically update the text when the property changes via its .Set() method
private ReactiveProperty<string> _text = new("Waiting");
protected override VisualElement Render()
{
    return VStack(
        Label().BoundPropValue(_text),
        Button(() => _text.Set("Thank you!")).Text("Click me!")
    );
}
Parameters
- prop -
ReactiveProperty<string>to bind to
TextElement.BoundPropText
Binds a ReactiveProperty to the text of a TextElement via a custom compute function.
This will automatically update the text when the property changes via its .Set() method
private ReactiveProperty<int> _counter = new(0);
protected override VisualElement Render()
{
    return VStack(
        Label().BoundPropValue(_counter, c => $"Counter: {c}"),
        Button(() => _counter.Set(_counter + 1)).Text("Click me!")
    );
}
Parameters
- prop -
ReactiveProperty<T>to bind to - compute - Function to compute the text from the property value
TextInputBaseField<string>.Value
Sets the value of a string input field
TextField().Value("Hello, world!");
TextInputBaseField<SType>.Delayed
Sets any input field to be delayed or not
TextField().Delayed(true);
TextInputBaseField<SType>.Delayed
Sets any input field to be delayed
TextField().Delayed();
VisualElement.Class
Assigns a list of USS classes to a VisualElement
Button().Class("btn", "btn-primary");
Parameters
- classNames - List ot class names to add
VisualElement.Children
Adds child elements to a VisualElement
Foldout().Children(
   Label().Text("Hello, world!"),
   Button().Text("Click me!")
);
VisualElement.Ref
Saves a reference to the created VisualElement in a provided variable reference for future use
Label label = null;
return VStack(
  Label().Text("Hello, world!").Ref(ref label),
  Button(() => label.text = "Wow, you clicked me!").Text("Click me!")
)
VisualElement.UserData
Stores an arbitary object in the userData property of a VisualElement
Label label = null;
return VStack(
    Label("Heyo!").UserData("Secret message!").Ref(ref label),
    Button(() => label.text = label.userData).Text("Reveal secrets!")
);
VisualElement.Name
Assigns a name to a VisualElement
Label().Name("my-label");
Notes
- This can be used to target elements via USS #selectors, e.g. #my-label
VisualElement.ViewDataKey
Assigns a view data key to a VisualElement
Foldout().ViewDataKey("my-foldout").Children(
   Label().Text("Hello, world!")
);
Notes
- This enables view state persistence on supported elements, e.g. Foldout or Scrollview. More info on Unity docs
VisualElement.Style
Enables arbitrary styles manipulation via an Action<IStyle> delegate
Label("Text with background color").Style(style => style.backgroundColor = Color.red);
Parameters
- setter -
Action<IStyle>that manipulates the style object of the target element
VisualElement.Padding
Sets the edge padding of a VisualElement
VStack(
   Label("Padded label").Padding(10),
   Label("Another padded label").Padding(5, 10),
   Label("Yet another padded label").Padding(5, 10, 15),
   Label("The last padded label").Padding(5, 10, 15, 20)
);
Notes
- 1 value: sets all paddings to the same value
- 2 values: sets top and bottom paddings to the first value, left and right paddings to the second value
- 3 values: sets top padding to the first value, left and right paddings to the second value, bottom padding to the third value
- 4 values: sets top, right, bottom and left paddings to the respective values
VisualElement.Margin
Sets the edge margin of a VisualElement
VStack(
   Label("Offset label").Margin(10),
   Label("Another Offset label").Margin(5, 10),
   Label("Yet another Offset label").Margin(5, 10, 15),
   Label("The last Offset label").Margin(5, 10, 15, 20)
);
Notes
- 1 value: sets all margins to the same value
- 2 values: sets top and bottom margins to the first value, left and right margins to the second value
- 3 values: sets top margin to the first value, left and right margins to the second value, bottom margin to the third value
- 4 values: sets top, right, bottom and left margins to the respective values
VisualElement.Relative
Sets the VisualElement's positioning to be parent-relative
VStack(
    Label("I'm relative!").Relative().Top(10)
);
Notes
- Useful for positioning elements inside a container
VisualElement.Absolute
Sets the VisualElement's positioning to be absolute
VStack(
   Label("I can overlap other elements").Absolute().Top(10).Left(30)
);
VisualElement.Top
Adds top offset to a VisualElement
VStack(
  Label("I'm 10px offset from the top").Top(10)
);
Parameters
- offset - Amount to offset by
VisualElement.Left
Adds left offset to a VisualElement
VStack(
  Label("I'm 10px offset from the left").Left(10)
);
Parameters
- offset - Amount to offset by
VisualElement.Right
Adds right offset to a VisualElement
VStack(
  Label("I'm 10px offset from the right").Right(10)
);
Parameters
- offset - Amount to offset by
VisualElement.Bottom
Adds bottom offset to a VisualElement
VStack(
  Label("I'm 10px offset from the bottom").Bottom(10)
);
Parameters
- offset - Amount to offset by
VisualElement.Flex
Sets the VisualElement's flex properties
HStack(
  TextField("I will grow").Flex(1),
  Button("I will not", () => {})
);
Parameters
- size - Flex size to use for ratio-based scaling. See Unity docs for more details
VisualElement.Wrapped
Enables word-wrapping on the VisualElement
Label("This text will wrap around if it's too long").Wrapped();
VisualElement.Bold
Makes the VisualElement's text bold
Label("I'm bold!").Bold();
VisualElement.Italic
Makes the VisualElement's text italicized
Label("I'm italic!").Italic();
VisualElement.BoldItalic
Makes the VisualElement's text bold and italicized
Label("I'm bold and italic!").BoldItalic();
VisualElement.Color
Sets the VisualElement's text color
Label("I'm red!").Color(Color.red);
VisualElement.Width
Sets the width of a VisualElement
Label("I'm 100px wide").Width(100);
IBindable.BindingPath
Sets the VisualElemenet's SerializedObject binding path
VStack(
    TextField("Object's name").BindingPath("name");
).BindSerializedObject(new SerializedObject(myObject));
Parameters
- bindingPath - Variable's binding path. Check Unity docs for more information on IBindable fields
VisualElement.BindSerializedObject
Binds a VisualElement to a SerializedObject
VStack(
   TextField("Object's name").BindingPath("name");
).BindSerializedObject(new SerializedObject(myObject));
Parameters
- serializedObject - SerializedObject to bind to
VisualElement.AlignItems
Aligns the children of a VisualElement
VStack(
  Label("I'm centered"),
  Label("I'm also centered")
).AlignItems(Align.Center);
Parameters
- align - Align mode. Check Unity docs for more information
VisualElement.JustifyContent
Justifies the content of a VisualElement
VStack(
    Label("I'm all the way to the left"),
    Label("I'm all the way to the right")
).JustifyContent(Justify.SpaceBetween);
Parameters
- justify - Justify Content mode. Check Unity docs for more information
VisualElement.Direction
Controls the direction of VisualElement's child alignment
VisualElement(
   Label("I'm first"),
   Label("I'm second")
).Direction(FlexDirection.Row);
Parameters
- direction - Flex direction for layout
VisualElement.ShowIf
Conditionally shows a VisualElement based on a provided condition function
var showHelp = false;
VStack(
    Label("Help info here").ShowIf(() => showHelp),
    Button("Toggle Help", () => showHelp = !showHelp)
);
Parameters
- condition -
Func<bool>that returns the visibility state
Notes
- This spools up a timer that evaluates the condition function every 300ms. Use
ReactivePropertyfor more efficient event-based updates
VisualElement.HideIf
Conditionally hides a VisualElement based on a provided condition function
var simpleMode = false;
VStack(
   Label("Advanced information").HideIf(() => simpleMode),
   Button("Simple Mode", () => simpleMode = !simpleMode)
);
Parameters
- condition -
Func<bool>that returns the hidden state
Notes
- This spools up a timer that evaluates the condition function every 300ms. Use
ReactivePropertyfor more efficient event-based updates
VisualElement.BindVisibleState
Binds visbility state of a VisualElement
var isVisible = new ReactiveProperty<bool>(true);
VStack(
    Label("Toggle Me").BindVisibleState(isVisible),
    Button("Toggle visibility", () => isVisible.Set(!isVisible.Value))
);
Parameters
- prop -
ReactiveProperty<bool>to bind to
Notes
- Compared to
HideIfandShowIfthis only updates the visibility state when the value changes
VisualElement.OnMount
Calls a provided callback on mount
VisualElement().OnMount(label => Debug.Log("Label mounted!"));
Parameters
- onMount - An
Action<T>function that receives the element reference on mount
Notes
- This is internally called on
AttachToPanelEvent
VisualElement.OnUnmount
Calls a provided callback on unmount
VisualElement().OnUnmount(label => Debug.Log("Label unmounted!"));
Parameters
- onUnmount - An
Action<T>function that receives the element reference on unmount
Notes
- This is internally called on
DetachFromPanelEvent
ForEach<T>.BoundToProp
Binds the ForEach element to a reactive property of IEnumerable<T> type. This automatically re-renders the elements on property change
var items = new ReactiveProperty<IEnumerable<string>>(new List<string> { "Item 1", "Item 2", "Item 3" });
return VStack(
   ForEach(items.Value, item => new Label(item)).BoundToProp(items),
   Button("Add Item").OnClick(() => { items.Set(new List<string>(items.Value) { "New Item" }); })
);
Parameters
- prop -
ReactiveProperty<IEnumerable<T>>to bind to
Notes
- The current implementation only re-renders when
.Setis called on the reactive property
ForEach<T>.BoundToProp
Binds the ForEach element to a reactive property of IEnumerable<T> type with a custom transform function. This automatically re-renders the elements on property change
var items = new ReactiveProperty<IEnumerable<string>>(new List<string> { "Item 1", "Item 2", "Item 3" });
return VStack(
   ForEach(items.Value, item => new Label(item)).BoundToProp(items, items => items.Reverse()),
   Button("Add Item").OnClick(() => { items.Set(new List<string>(items.Value) { "New Item" }); })
);
Parameters
- prop -
ReactiveProperty<IEnumerable<T>>to bind to - transform - A
Func<IEnumerable<T>, IEnumerable<T>>transform function that prepares the elements to be rendered by thetemplatefunction
Notes
- The current implementation only re-renders when
.Setis called on the reactive property - The
transformfunction can be used to prepare elements to be rendered by thetemplatefunction